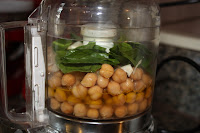
We planted too many herbs. And what are you supposed to do with lemon-basil anyway? It looks like basil, it smells like lemons, but it tastes sort of sweet and not unlike those original yellow trix, back when the cereal came as rounded puffs. I've been toying with the idea of putting the lemon-basil into somewhat savory baked goods, like a scone, but because I haven't attempted regular scones yet I didn't want to start with weird ones first. Almost every herb will work in hummus though, and most hummus contains fresh lemon juice already, so lemon-basil hummus seemed like an easy and natural pairing. Feel free to change up this basic recipe on your own. Just remember to include additional lemon juice (1-2 tbs more) if you use non-citrus flavored herbs.
Lemon-basil Hummus
- 15oz can of chickpeas (garbanzo beans)
- 1/4 cup liquid from can of chckpeas
- 2 tablespoons fresh lemon juice
- 1.5 tablespoons tahini
- 2 garlic cloves
- 1/2 teaspoon salt
- 2 tablespoons olive oil (virgin/extra virgin)
- 2 tablespoons lemon-basil (leaves crammed into spoon)
Put everything into a 3-cup processor, chopper, or blender (or work in batches if you have a smaller one). Blend until smooth.
You can certainly do this by hand if you don't own a processor or blender, but it required much more labor because you'll need to mash the chickpeas with a fork and finely chop the garlic and herbs.
Saturday, July 21, 2012
Sunday, July 15, 2012
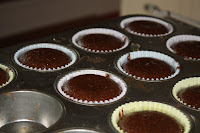
Best Cupcakes Ever*
* If you love chocolate and are not allergic to nuts!
These cupcakes also happen to be gluten-free, but that's only because they are pretty much just ground up chocolate and almonds held together by eggs and oil. I'm generally not a fan of nuts in baked goods like brownies, but here the ground almonds take the place of flour and it's easy to forget that they are a major ingredient.
I can't take any credit for the recipe. I was looking for a flourless chocolate cake recipe, sort of as an inside joke (and yes, as of this post, still owed to me by Rob W.), and happened upon a fellow food-lover's blog. I don't bake sweets often, but I've made these four times now and they appear to have become a highly anticipated item at summer bbqs. These cupcakes are fantastic (seriously, one of the best things I've ever eaten), and super easy to make.
The full recipe can be found here: http://www.elanaspantry.com/flourless-chocolate-cupcakes
Some comments from my own experience:
Pulse the chocolate and almonds as finely as you can, but it doesn't seem to matter too much if the bits are still rather course. The addition of the liquid ingredients smooths out everything. If you want stretch the recipe to 12 cupcakes (unmodified it makes 10), add 20% more almonds and 20% more chocolate, but don't change the other ingredients.
I've now tried the recipe with both honey and agave nectar. The flavor is very similar with either, but the agave necter provides a richer texture that more closely resembles actual flourless chocolate cake. Agave necter can be expensive though, and it's probably not something most people keep on hand. I found that honey works well, but contains less water, leading to a more viscous batter. When baking with honey, the cupcakes may need 20-22 minutes in the oven, and still won't look completely set. With agave nectar, my baking time was around 15 minutes. Those also looked a little underdone in the end, but my experience with both versions is that the cupcakes firm up nicely while cooling. Neither version will pass the toothpick test as one might do for brownies, so don't bother.
Keep in mind that the unmodified recipe makes only 10 cupcakes. Trust me, unless you are expecting less than 10 people, make a second batch. Particularly if you want to save some for yourself.
What to put on top? Well, how about a nice chocolate cream cheese frosting?
- 4 oz cream cheese
- 1/4 cup unsalted butter (take out before you start the cupcakes)
- 1.5 to 2 cups powdered sugar (I've usually needed a bit less than 2 cups)
- 1/4 cup cocoa powder
Mash the cream cheese and butter with a fork until smooth. You'll want these both at room temperature before you start, the softer the better, but not melted. Mix in powdered sugar, a little at a time. First sort of mash it in, then stir vigorously. Try and get the mix as smooth as possible. Then mix in the cocoa powder. At first it won't seem to take and will become weird and goopy. Keep mixing until everything blends together into a smooth and creamy frosting. If there is any extra frosting, it's great on strawberries.
Friday, February 3, 2012
Guest Star: Mac n' Cheese
Today's Guest Star is brought to you by Michelle, who says: "This is the closest that I've been able to replicate my favorite mac and cheese. I had it with Sterling in NYC at a place called S'Mac. Sooooo good! This recipe is great for using leftover ham, or just when you want a lot of cheese." Sounds fantastic to me!
Guest Star: Grown-up/Awesome/Best Mac and Cheese
- left-over ham, in smallish pieces
- shallots, 1 or 2, sliced thin
- figs, one handful, sliced in half
- fresh rosemary, as much as you want, chopped
- butter, 2 tbs plus 3 tbs plus 1 tbs
- smoked cheddar, 1 cup grated
- cheddar, 1 cup grated
- elbow macaroni, one pound
- Parmesan, about 1/4 cup
- bay leaves, 2
- flour, 3 tbs
- milk, 2.5 cups
- salt and black pepper to taste
1. preheat oven to 400F. Bring a large pot of water to a boil.
2. Cook the milk with the bay leaves in a small saucepan over medium-low heat. When small bubbles appear along the sides, turn off heat and let stand. While the milk is cooking, melt 2 tbs of butter in small saute pan. Add ham and sliced shallots. Stir off and on until shallots are soft, then add figs and half the rosemary. In large pot, add salt and cook the pasta until it's just underdone. Drain the pasta. You can either leave it in the colander or put it back in the pot, but be careful that it doesn't stick to the pot- turn the heat to low.
3. In another small saucepan over medium-low heat, melt 3 tbs of butter. When it's golden and foamy, add the flour and cook, stirring with a whisk, until the mixture browns. Remove the bay leaves from the milk now and start adding milk in 1/4 cup portions to the floury goo. As soon as the milk is incorporated, add more, and keep doing that until all the milk is added. Now add the grated cheese. Keep stirring with that whisk or everything is stuck together!
4. Add your ham-shallot-fig-rosemary mixture to the cheesey goodness. Add the rest of the chopped rosemary, too. Stir! Now, if you put the pasta back in it's pot, pour the cheesy mixture over the pasta and stir to incorporate fully. Use that last tablespoon of butter to coat the inside of a 9x13 pan (I used a glass Pyrex pan). Now pour in the mac and cheese. Once it's all in the pan, sprinkle the Parmesan on top. Put it in the oven! Set your timer for 20 minutes, but you can check and take it out once it's started to brown on top. Eat! Soooo good.
Thursday, January 12, 2012
Guest Star: Sweet Pepper Marinara Sauce
Today's Guest Star is a zesty twist on marinara sauce that comes from Katie. Yes, the ingredient list does call for a "peck" of peppers. Don't worry, a picture of a "peck" is included so that you can be sure to buy enough peppers (Ok, fine! A peck equals about 2 gallons).
One peck!
Sweet Pepper Marinara Sauce
Servings: 9-10 pints
- 1 peck banana peppers (sweet)
- 3 jalapeno peppers
- 1 24 oz bottle ketchup
- 1 8 oz can tomato paste
- 1 tablespoon salt
- 3 cups sugar
- 3 large onions
- 4 cloves garlic
- 2 tablespoons basil
- 1 pint vinegar (white)
- 1 pint canola oil
Take the seeds out of the banana peppers and slice them into rings. Chop the jalapenos and garlic. Slice the onions into rings.
Combine all ingredients except banana peppers into a large pot and boil until onions are soft. Add peppers and boil until the peppers are somewhat soft. Serve or put into jars/containers for canning or freezing.
All sliced
Cooking down
Thursday, December 15, 2011
Meatball Subs
Meatball subs, meatball heroes, meatball hoagies, meatball parmesan. Whatever you call them, these meaty, cheesy, saucy, crispy, hot sandwiches are always delicious. Despite that, I rarely make them because I tend to think of meatball subs as being too messy or too complicated. The first can't really be helped, but the second can't be further from the truth, even if you make the meatballs from scratch. In this recipe the meatballs are dusted with breadcrumbs and then baked to keep them firm for the sandwiches. For pasta, you could bake them or cook them directly in the sauce (I prefer the latter), but either way, don't coat them in breadcrumbs.
Meatball Subs
Servings: about 4 large
Time: 45 mins
- 1.25 lbs meatball mix* (ground beef and pork)
- 1 egg
- 1/4 cup Italian seasoned breadcrumbs, plus extra for dusting
- 1 tsp dried parsley
- 1 tsp dried basil
- 1 tsp Italian seasoning
- 1/2 tsp salt
- 1/4 teaspoon pepper
- 1/2 tsp garlic powder
- 1/2 tsp onion powder
- tomato sauce
- fresh mozzarella
- crusty bread
* You may not believe me, but a mix of ground meats is essential for flavor and texture. Some mixes come with a little ground veal or lamb in addition to pork and beef.
Preheat oven to 350 degrees. Line a baking sheet with foil and spray lightly with cooking spray. Pour a small amount of breadcrumbs into a small bowl for later.
In a large bowl, combine the meat, seasonings, breadcrumbs, and egg. Mix these well with your hands. Take a small amount in your hands (enough to form a ball somewhere between a golf ball and baseball - about 2-2.5") and gently roll. Try to avoid leaving cracks that may split during baking, but don't overwork the meat or it will not be tender after cooking. Roll each meatball in a small amount of breadcrumbs (a dusting). Place each meatball on the prepared sheet and place the tray in the oven for about 25 minutes. Check on the meatballs after about 15 minutes and adjust the cooking time if necessary (different amounts of fat cook differently).
In the meantime, cut the bread lengthwise, leaving the two halves attached as a cradle for the meatballs. Place a little cheese and sauce at the bottom and then slice or pull apart the rest of the cheese for the topping.
When the meatballs are done, you may want to cut a few in half for the sandwiches. They will be easier to eat than whole meatballs. Stuff a few halves in between the bread, then top with cheese and more sauce. Pop the sandwiches back into the oven for about 10 minutes, or until the cheese is melty.
Sunday, August 14, 2011
green bean, potato, and tomato salad
Great summer side dish made with seasonal veggies. Olive oil and lemon juice create a light dressing that feels fresher than heavy mayo- or mustard-based potato salads.
green bean, potato, and tomato salad
Serves: 6 large side portions
Time: 30 minutes
- 3 medium potatoes
- about 1 pound green beans
- 1 large ripe tomato or 2 medium
- 1 large lemon
- salt (kosher if you have it)
- pepper
- olive oil
Peel potatoes and slice into larger chunks, about 1-2". Place chunks in a large pot, cover with water (about an inch above potatoes), bring to a boil, and cook for about ten minutes. We're not making mashed potatoes; most people like potatoes in potato salad to be tender but firm. However, I actually prefer this salad when the potatoes get a little soft and break apart. Helps coat the green beans later, but doesn't look as pretty. Don't worry too much about overcooking, but keep on eye on the potatoes, testing them for firmness with a fork. Once done, drain potatoes into a colander and rinse thoroughly under cold water to stop the cooking.
While the potatoes are cooking, trim the beans. Once the potatoes are done and cooling, fill the large pot with enough water to cover the beans (again, 1-2" above veggies). Bring the water to boil BEFORE adding the beans. Once boiling, toss beans into the water and cook for about 2 MINUTES. You want them tender-crisp. Drain beans into colander, and again rinse with cold water to stop the cooking. By the way, purple beans will turn green as they cook.
Add potatoes and beans to a large bowl. Chop the tomato into large chunks and add to the other veggies. Drizzle the whole thing with olive oil. More than a teaspoon, but probably not more than a tablespoon. This well depend on your taste though, and how dry the potatoes are. Cut the lemon in half, pick out the seeds with a knife-tip and squeeze one half all over the salad. You should get about a tablespoon of juice. Sprinkle about a teaspoon of kosher salt (1/2 teaspoon if regular salt) over the salad, and shake a few dashes of pepper over the top (again, to taste). Gently toss the entire mix together until the veggies are coated. This can be served room temperature or cold, and chilling it should intensify the lemon flavor.
Wednesday, August 3, 2011
Potato and Chorizo Fritatta
I'm usually not a fan of breakfast foods for dinner, but for some reason frittatas seem like an all-the-time food, even though the base ingredient is egg. This one is based loosely on the flavors you would find in a Spanish omelet, although my real goal was to use up two potatoes we had sitting around. I managed to find chorizo (Spanish spicy sausage) at our local Price Chopper (*shudder*), so I don't think it will be too hard to find. If it's not with the sausage, try looking by the hot dogs. Yup.
Potato and Chorizo Frittata
Servings: 6
Time: 50 mins - 1 hour
- 1 large or 2 small baking potatoes
- 1 large bell pepper
- 1 small to medium onion
- 2 chorizo links (remove casing)
- crusty/stale bread
- 10 eggs
- milk (optional)
- 1/8 to 1/4 cup feta cheese
- salt and pepper to taste (optional)
- (maybe) olive oil
- cooking spray (optional, but helps)
Cook the chorizo in a large non-stick frying pan over medium heat, making sure to crumble the sausage into small pieces. While the chorizo cooks, dice the potato into small cubes. When the chorizo is finished cooking (should brown and crisp a bit), remove the sausage bits with a slotted spoon, leaving the delicious grease behind.
Cook the potatoes over medium heat in the same pan that was used for the chorizo. Make sure to stir them around in the chorizo drippings. If the potatoes are still too dry, add a little olive oil. The potatoes will take a while (15-20 mins) to soften. In the meantime, chop the onion, and then add it to the potato. Again, if it looks too dry, add a little olive oil and stir. Make sure to keep moving those veggies around every few minutes. Chop the bell pepper and add that to the potato-onion mixture.
Continue cooking until the potato and pepper are soft, but not mushy. They will continue cooking in the oven.
When the veggies are done, stir in the chorizo and mix well. Remove the pan from the heat and let the mixture cool. Preheat the oven to 375 degrees.
Spray the bottom and sides of the frittata dish (ovenproof glass is best)with a little cooking spray, and then cut up the bread into irregular pieces and use it to line the bottom of the dish.
In a large bowl, beat the eggs along with about 1/4 cup of milk. The milk is not essential, but makes the egg fluffier. You may also add some salt and pepper, though note that most chorizo is salty and spicy already. We didn't need any extra seasoning. Also, it may be easier to beat the eggs in batches of five.
Pour the potato-chorizo mixture over the bread layer. Sprinkle feta cheese over the entire thing.
Pour the egg slowly over the top, making sure to fill in the sides, middle, etc. The egg should fill the cracks between the veggies and then just slightly rise over the top of everything in a thin, even layer. You can add a beaten egg or two if you're short.
Bake in the oven for about 25-30 minutes. I cheated and broiled the top for a few minutes at the end because we're stuck with an electric stove until September!
Subscribe to:
Posts (Atom)